SIMPLE / FAST / PRIVATE
Your Ethereum Node on Raspberry Pi
Web3 Pi simplifies the process of running an Ethereum node
on Raspberry Pi, making it accessible even for non-technical users.
The WelcomeBox provides a complete set of hardware to get started.
Powered by ARM architecture, it ensures efficient blockchain access,
low energy consumption, and high performance.

What's inside?
Inside your Welcome Box you'll find everything you need to get started with Web3 Pi.
LCD Dashboard
A color LCD mounted in a specially designed, 3D-printed flap that displays essential device and node status information. The flap can be printed in various colors, allowing you to personalize your device’s appearance and add a modern touch to the case’s design.


Active Cooling
An advanced cooling setup with a built-in fan and heatsink, ensuring optimal temperatures and reliable performance under heavy workloads. The fan speed is dynamically controlled based on the CPU temperature, helping maintain low noise levels.
Raspberry Pi 5 8GB
The heart of the Web3 Pi setup, this board is powered by an advanced ARM architecture, ensuring efficient blockchain access, low energy consumption, and high performance. With global popularity and wide availability, it remains an accessible platform for building decentralized applications.
2TB NVMe Storage
2 TB of storage is required to accommodate the full Ethereum blockchain. Powered by high-speed NVMe M.2 storage, the WelcomeBox delivers reliable performance in a compact design, enabling smooth blockchain synchronization and efficient data handling for decentralized projects.
Bottom Heatsink
A dedicated NVMe heatsink ensures stable drive temperatures during intense read/write operations, especially when synchronizing a node. By efficiently dissipating heat, it preserves high NVMe performance and extends hardware lifespan.
Get Ready in 4 Steps
Here's how simple it is:
Assembly
Unbox your kit and follow the instructions to set up your Raspberry Pi device.
Installation
Use our automated installer to provision the Ethereum node software onto your hardware.
Synchronization
Wait for the node to fully synchronize with the Ethereum blockchain. You can monitor the synchronization status on Grafana dashboard.
Ready to Use
Begin interacting directly with the Ethereum blockchain, enjoying full control and enhanced privacy without any third-party dependencies.
Why Web3 Pi?
Owning your own Ethereum node is a powerful way to take control of your data, transactions, and interactions on the blockchain. It provides maximum privacy, ensures that you rely on no third parties, and directly contributes to the security and stability of the Ethereum network itself. With Web3 Pi, you can experience all of these benefits on the affordable, energy-efficient, and compact Raspberry Pi. Thanks to the ARM architecture, you can operate a node on minimal hardware without sacrificing reliable performance or running up hefty electricity bills.
At Web3 Pi, we believe that setting up a blockchain node shouldn’t be reserved for experts. Our automated installer and step-by-step instructions remove the complexity, while our WelcomeBox includes all the essential hardware you need to get started—no technical background required. Once you’re up and running, our project’s active development ensures you’ll always have access to timely updates, new features, and an engaged community ready to help and collaborate. By choosing Web3 Pi, you not only lower the barrier to entry into blockchain technology, but you also support the broader ecosystem of decentralized solutions, strengthening Ethereum and bringing Web3 closer to mainstream adoption.
Retain complete control over your data with no reliance on intermediaries.
Our optimized setup delivers solid power while keeping hardware requirements minimal.
Automated installation and clear instructions replace complex node deployments.
Uses minimal energy, preventing high electricity bills while enabling continuous blockchain operations.
Features
What you get with Web3 Pi
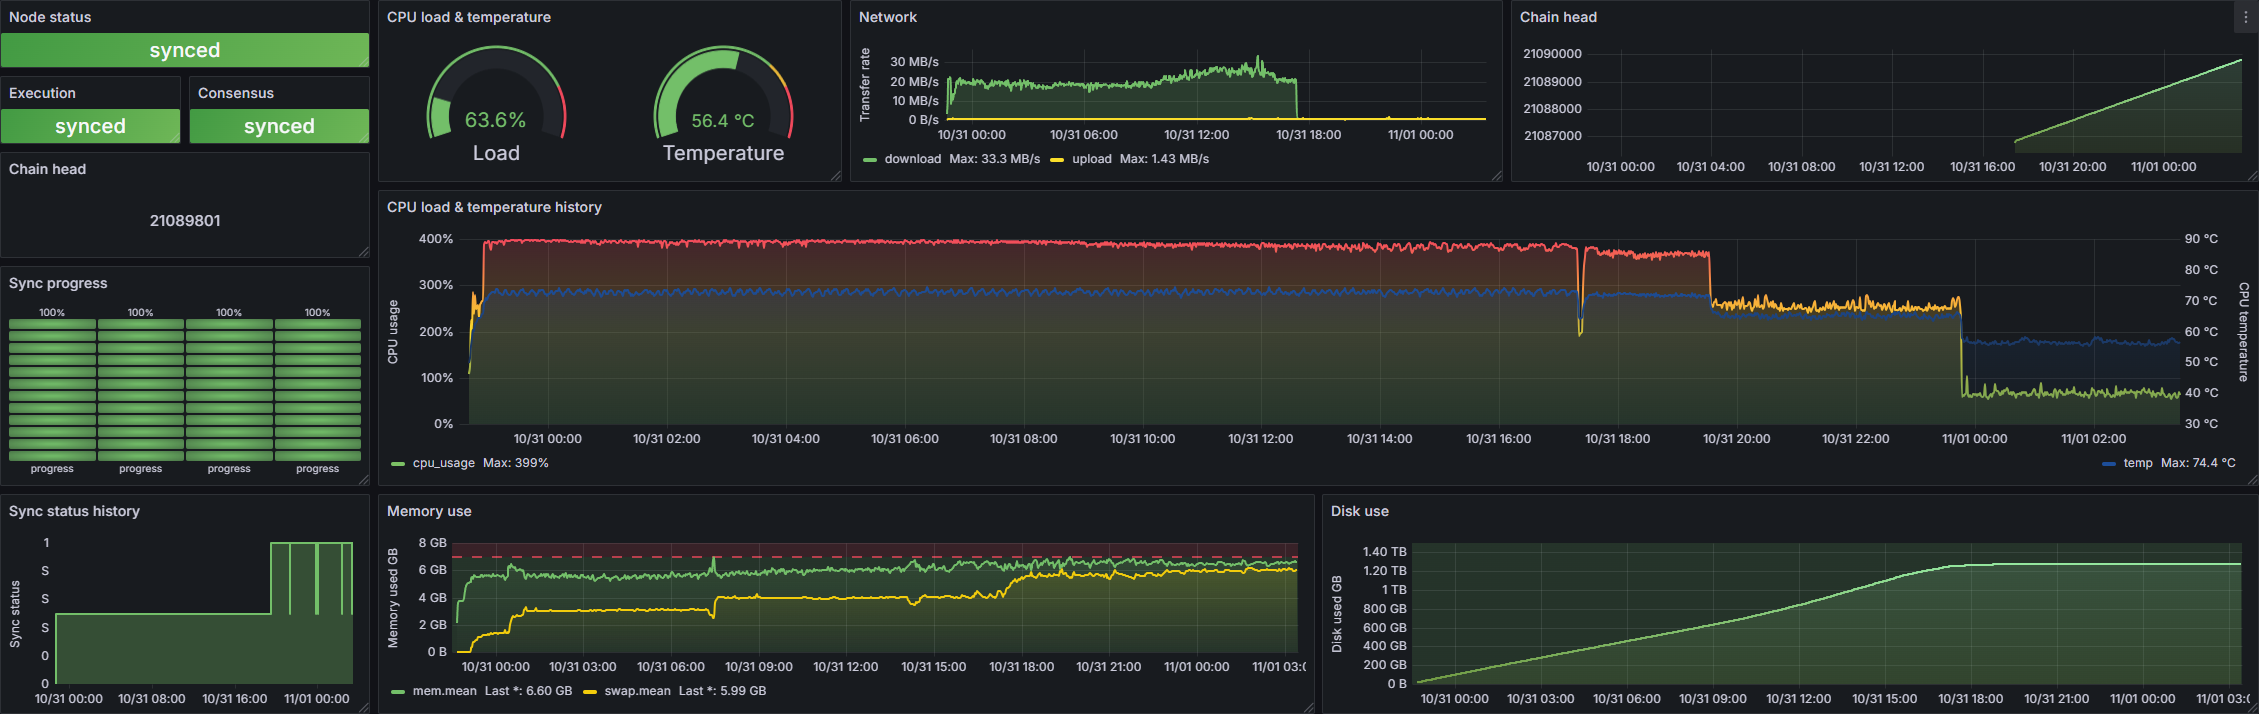
Grafana monitoring
Web3 Pi provides an intuitive, web-based dashboard for tracking the synchronization status of your Ethereum node and its ongoing performance. Leveraging a custom-designed Grafana dashboard, it displays all the critical metrics without creating unnecessary system overhead. Additionally, with Web3 Pi Link, you can securely access these insights over the internet from virtually anywhere.
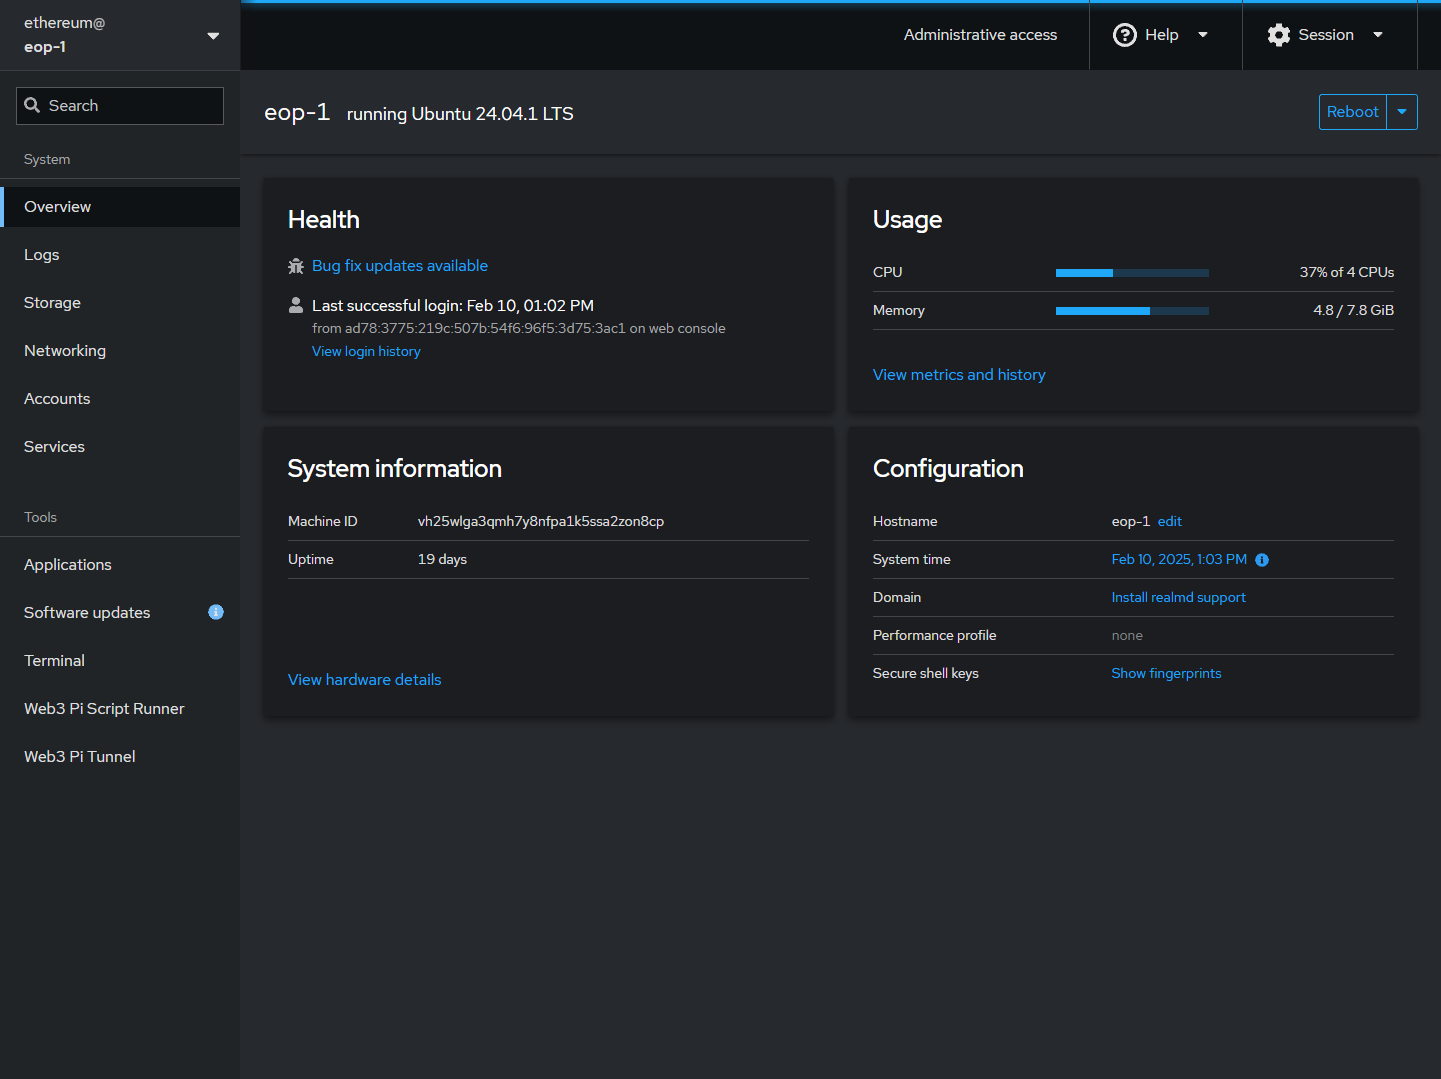
Remote management (Cockpit)
Remote management leverages the well-known Cockpit Project, providing comprehensive, browser-based control of your Web3 Pi device—including remote SSH access. We’ve enhanced Cockpit with custom plugins offering specialized features tailored to Web3 Pi. This streamlined solution ensures convenient oversight and management from virtually any location.
Web3 Pi Link
Remote port access (Web3 Pi Link) is a service that lets you publicly expose any TCP port over the internet—even behind NAT—without needing router access. Configuration is simple through our dedicated Cockpit plugin, which establishes a secure tunnel via our server and provides you with a unique yourname.web3pi.link address. This setup makes it easy to share your monitoring dashboard, management interface, or RPC HTTP API.


Web3 Pi Imager
Web3 Pi Imager is a user-friendly application designed to simplify the process of burning Web3 Pi images. In just a few clicks, you can prepare your Raspberry Pi to function as a full Ethereum node. The application provides step-by-step guidance and offers an intuitive interface for selecting settings, making it accessible even to non-technical users

LCD dashboard
LCD dashboard delivers at-a-glance insights into your node’s status via a built-in color screen, seamlessly integrated into the custom WelcomeBox enclosure. This convenient display shows essential system and Ethereum client information, allowing you to check your node’s health without needing another computer or browser.

Supported Hardware
We support the following configurations

Raspberry Pi 5 8GB
Single Mode
The recommended version for Web3 Pi, offering excellent performance. It supports both NVMe and USB 3.0 SSDs, ensuring rapid data access. It’s the ideal choice for most users seeking a balance between cost and capabilities.
Raspberry Pi 5 16GB
Single Mode
With expanded RAM, you can run more software simultaneously without compromising performance. However, this added power comes with a higher price tag. It’s perfect for those who demand maximum performance and scalability.

2x Raspberry Pi 4 8GB
Dual-Device Mode
To run a full Ethereum node on Raspberry Pi 4, we recommend a dual-device mode setup, where one device hosts the execution client and the other the consensus client. This configuration ensures each client has enough resources without overloading a single device.

Compute Module 4/5 8GB
Custom
This edition requires a custom carrier board and is suited for advanced users. It offers flexibility for specialized or large-scale projects. While more complex to implement, it grants maximum control over hardware.
FAQs
Frequently Asked Questions
What’s the purpose of running my own node?
Running your own node gives you full control over your connection to the Ethereum network. It enhances privacy, improves security, and ensures access to uncensored blockchain data without relying on third-party services. Unlike cloud-based solutions, a self-hosted node has no request limits and offers significantly higher performance. A local node provides drastically lower latency compared to internet-based RPC services, resulting in unmatched efficiency and responsiveness. With Web3 Pi, you contribute to network decentralization while enjoying a high-performance, self-sustained Ethereum node.
Can I stake ETH using Web3 Pi on a Raspberry Pi 5?
Yes! We have conducted months of testing, during which we successfully ran 200 validators using Raspberry Pi 5 devices. At the current stage of Web3 Pi development, staking requires additional manual configuration. However, we plan to simplify and partially automate this process, allowing users to set up ETH staking directly from a web browser in the future.
Do I need 32 ETH to run a node?
No, you don’t need 32 ETH to run a node. Anyone can run a full Ethereum node to verify transactions and contribute to network decentralization without staking any ETH. With Web3 Pi, you can do this incredibly easily and quickly, making it accessible even for those with no prior experience.
How long will it take to sync a node?
The synchronization time depends mainly on your internet connection speed and storage performance. On a Raspberry Pi 5 with an NVMe SSD—the same setup as in the Web3 Pi WelcomeBox—the process takes less than 24 hours. On a Raspberry Pi 4, synchronization takes significantly longer.
Can I manage my Web3 Pi node remotely over the internet?
Yes! Web3 Pi provides a dedicated service called Web3 Pi Link, designed for remote access and management. With Web3 Pi Link, you can easily share the management panel, monitoring dashboard, or RPC API publicly—without the need for complex router configuration. Even if your device is behind NAT, you can securely access and control your node with minimal effort.
Where can I find help if I need it?
If you need assistance, the best place to ask for help is our Discord channel, where we actively support users and troubleshoot issues together. Additionally, we recommend checking our documentation, which covers many important topics, including a troubleshooting section that addresses common problems and solutions.
Why Raspberry Pi?
Raspberry Pi is globally available, supported by a large community, and affordable. It consumes less than 8W, making it efficient for 24/7 operation. Its compact size, customization options, and ARM architecture make it a flexible and reliable choice for running a Web3 node.
How much does it cost to power a Web3 Pi node per month?
The cost depends on electricity prices in your country. Based on the average electricity rate in Poland, running a Web3 Pi node 24/7 costs less than $2 per month.
Do I need specific hardware to run Web3 Pi other than a Raspberry Pi?
Yes, you need 2TB of storage to store a full copy of the Ethereum blockchain. This must be high-speed NVMe or USB 3.0 SSD—do not use HDD. Additionally, active cooling for the CPU is required, as the synchronization process fully loads the processor for about 24 hours.
What are the internet requirements?
For optimal synchronization performance, your internet connection should have a download speed of at least 160 Mb/s (20 MB/s). The upload requirement is much lower, but a stable connection with low latency (ping) is recommended. Syncing with the Ethereum mainnet requires downloading around 1.2 TB of data. Do not use metered connections. A slower connection will still work, but synchronization will take longer. Beyond speed, connection stability is key to ensuring reliable node performance.